Friday, February 1, 2013

How to add Slider or Trackbar to a cvWindow

0 comments
    You might have seen my previous post regarding the HSV values extraction. That code used Sliders to vary the value of the parameter passed to the thresholding algorithm. In this post, we are going to learn ahow to add a Slider or Trackbar to a cvWindow.

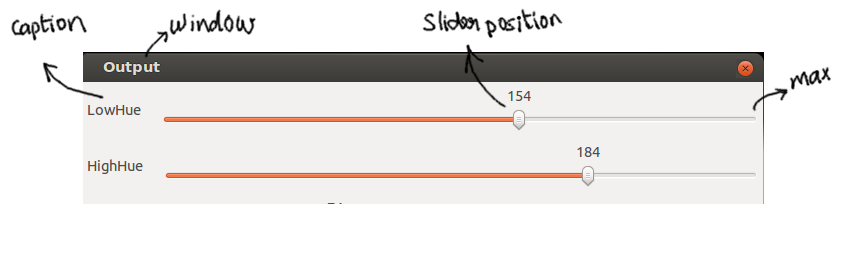
the function below will create and add a trackbar to the window "Output"
  cvCreateTrackbar("LowHue", "Output", &lowHue, max, onLowHue);

you see here five arguments to the function.

"LowHue" - it is a string, used as caption on the cvWindow above the Trackbar. something like a name for the trackbar.


"Output" - name of the window, which must be created using cvNamedWindow("Output", CV_WINDOW_NORMAL ) before attaching a trackbar to it.
 cvNamedWindow("Output",CV_WINDOW_NORMAL)

&lowHue - it is a variable, corresponding to the slider position.
 int lowHue = 10;

max - maximum value for the slider. the value corresponding to slider postion when it is at the rightmost end.
 int max = 255;

onLowHue - it is a function pointer, which will be called when, there is a change in slider position due to user interaction.

void onLowHue (int value )

     lowHue = value;
 }

voila!!!
Read more ►

HSV trainer

1 comments
    This code snippet extracts the lower and higher bound HSV values for the object of interest.

Code Listing

#include<stdio.h>
#include<cv.h>
#include<highgui.h>

int max = 255;

int lowHue = 10 ;
int lowSat = 0 ;
int lowVal = 0 ;

int highHue = 100 ;
int highSat = 255 ;
int highVal = 255 ;

void onLowHue ( int value ) { lowHue = value ; }
void onLowSat ( int value ) { lowSat = value ; }
void onLowVal ( int value ) { lowVal = value ; }

void onHighHue ( int value ) { highHue = value ; }
void onHighSat ( int value ) {  highSat = value ; }
void onHighVal ( int value ) { highVal = value ; }

IplImage* hsv_from_rgb(IplImage* _src);
IplImage* hsv_threshold ( IplImage* _hsv_src,
     CvScalar _min,
     CvScalar _max );

void cvCreateShowWindow(char* name, IplImage *src)
{
 cvNamedWindow(name,CV_WINDOW_NORMAL);
 cvShowImage(name, src);
 
}

IplImage* resize_640x480(IplImage* _src)
{
    IplImage* res = cvCreateImage( cvSize(640,480) ,
                                   _src->depth, 
                                   _src->nChannels
                                  );   
    cvResize ( _src, res, CV_INTER_LINEAR );
 return res;
}

int main ( int  argc, char* argv[] )
{
 if ( argc < 2 ) {
     printf ("Error: no input image found\n" ) ;
     exit (1) ;
   }
 cvStartWindowThread();

   IplImage* src = cvLoadImage(argv[1], CV_LOAD_IMAGE_UNCHANGED);
   cvCreateShowWindow("src", src);
   cvWaitKey(0);
   IplImage* cir = cvCloneImage (src) ;
   //IplImage* _src = cvCreateImage ( cvGetSize(src), IPL_DEPTH_8U, 1 ) ;
   //cvCvtColor (src, _src, CV_BGR2GRAY) ;
   IplImage* _src = resize_640x480 (src);
   //cvSmooth ( _src, _src, CV_GAUSSIAN, 15, 0, 0, 0);

   cvCreateShowWindow(" input", _src);

  cvCreateShowWindow("Output",_src  );

  cvCreateTrackbar("LowHue", "Output", &lowHue, max, onLowHue);
  cvCreateTrackbar("HighHue", "Output", &highHue, max, onHighHue);

  cvCreateTrackbar("LowSat", "Output", &lowSat, max, onLowSat);
  cvCreateTrackbar("HighSat", "Output", &highSat, max, onHighSat);

  cvCreateTrackbar("LowVal", "Output", &lowVal, max, onLowVal);
  cvCreateTrackbar("HighVal", "Output", &highVal, max, onHighVal);

  CvMemStorage* storage = cvCreateMemStorage(0);
  IplImage* hsved = hsv_from_rgb ( _src );
  IplImage* res ;
 while ( 1 )
 {
   res = hsv_threshold( hsved, 
                        cvScalar( lowHue, lowSat, lowVal, 0),
                        cvScalar( highHue, highSat, highVal, 255) );
   cvWaitKey(30);
   cvShowImage("Output", res );
 
 } // End of while loop
  
  cvCreateShowWindow("res", res);
  cvWaitKey(0);
  cvDestroyWindow("res");
  cvDestroyAllWindows();
}  

IplImage* hsv_from_rgb(IplImage* _src)
{
  IplImage* img = cvCloneImage ( _src ) ;
  cvCvtColor ( _src, img, CV_BGR2HSV );
  return img;
}

IplImage* hsv_threshold ( IplImage* _hsv_src,
     CvScalar _min,
     CvScalar _max )
{
    IplImage* thresholded = cvCreateImage(cvGetSize( _hsv_src ), 8, 1 );
    cvInRangeS( _hsv_src, _min, _max, thresholded );  
    return thresholded;  
}


    Run the program with any input image. Adjust the slider so that the object of interest is show white. Note the values. Thats it. You are done.
 
Read more ►

Second Review - Report

0 comments
   Well, the second review went very well.We have showed the program that tracks the ball. Before the review, we tested the code with the images of same ball at different environments. WHITE is a major villain in HSV space. So we tried with different colored environments. Actually only three backgrounds. The Hue values almost remained the same. So it was easy to extract the position of the ball.

   We used this snippet, for extracting the HSV values for training(what we call it) the code for object detection. Just before the review started, we shot another video of the ball in the lab itself and trained the code to suit the environment. We just finished extracting concurrent values for HSV params, the reviewers entered the lab.

   Suriyadeepan first presented the control of bot using Android through Blue-tooth(BtBee) module. Then the object tracking code is demostrated. Thats it. Thank you for reading this boring story.


Second Review report can be downloaded here
Read more ►

Thursday, January 31, 2013

Second Review

0 comments
Tomorrow comes the second review. Prepared report and planned to show,
  • Controlling of locomotion of the bot through Android.
  • Tracking the ball, in video input.
Ooh. I didn't tell you anything about the bot, right? wait-up until the review is over. I'll reveal the story.

Time to bed.
Read more ►

Tuesday, January 29, 2013

Vision Implementation Part-I

1 comments
This is first post in this series. Vision Implementation.

   Our image processing approach uses simple filters, morphological operation and few transforms for object detection from  OpenCV library. OpenCV comes with very high level object detection and segmentation algorithms. But there is a reason why we use simple operations.


    i. For using high level features extractors and classifiers, the object must have considerable amount of texture. i.e corners, edges, gradients etc. in our case the ball does not have much texture on it.
   ii. To use classifiers, the code must be trained before used to detect objects, which is a time consuming, and tedious process.
  iii. third and important reason is, "isn't it enough to use simple transforms instead of complex algorithms, if the former one does the intended job"

To code then:
  Here is the snapshot of Work in Progress(WIP) working code. We will go block by block.

#include<stdio.h>
#include<cv.h>
#include<highgui.h>

void cvCreateShowWindow ( char* _name, IplImage *_src ) ;
IplImage* hsv_from_rgb  ( IplImage* _src )    ;
IplImage* hsv_threshold ( IplImage* _hsv_src,
        CvScalar _min,
        CvScalar _max )    ;
IplImage* hough_circles ( IplImage* _src )    ;
IplImage* find_contours ( IplImage* _src )    ;


int main(int argc, char* argv[])
{
  if ( argc < 2 ) {
    printf ("Error: no input image found\n" ) ;
    exit (1) ;
  }

  char* image = malloc ( sizeof ( argv[1][0] ) 
       * strlen ( argv[1] ) + 1) ;
  strcpy ( image, argv[1] ) ;
  cvStartWindowThread();

  IplImage* tmp = cvLoadImage ( image, CV_LOAD_IMAGE_UNCHANGED ) ;
  cvCreateShowWindow("tmp", tmp);

 /* defines the stages of processing pipeline...*/
 #define CV_ATHENA_HSV_CONVERSION     1
 #define CV_ATHENA_HSV_THRESHOLD      1
 /* #define CV_ATHENA_ADAPTIVE_THRESHOLD    1 */
 #define CV_ATHENA_SMOOTH_BEFORE_MORPH  1
 #define CV_ATHENA_MORPH       1
 #define CV_ATHENA_SMOOTH_BEFORE_THRESHOLD 1
 #define CV_ATHENA_THRESHOLD     1
 #define CV_ATHENA_SMOOTH_BEFORE_CANNY     1
 #define CV_ATHENA_CANNY       1
 #define CV_ATHENA_HOUGH_CIRCLES     1
 /* #define CV_ATHENA_CONTOURS             1 */

#ifdef CV_ATHENA_HSV_CONVERSION
  IplImage* hsv_src = tmp;
  IplImage* hsved = hsv_from_rgb(hsv_src);
  cvCreateShowWindow("hsved", hsved);
  cvSaveImage("hsved.jpg",hsved,0);
#endif /* CV_ATHENA_HSV_CONVERSION */


#ifdef CV_ATHENA_HSV_THRESHOLD
  IplImage* thresh_src = hsved ;
  IplImage* thresholded = hsv_threshold ( thresh_src, 
            cvScalar(36, 0, 0,0),
            cvScalar(50, 255, 255,255)
          );
  cvCreateShowWindow("thresholded", thresholded);
  cvSaveImage("thresh.jpg",thresholded,0);
#endif /* CV_ATHENA_HSV_THRESHOLD*/


#ifdef CV_ATHENA_ADAPTIVE_THRESH
  IplImage* adaptive_src = thresholded ;
  IplImage* adaptive_thresh = cvCloneImage(adaptive_src) ;
  cvAdaptiveThreshold ( adaptive_src, adaptive_thresh, 255,
         CV_ADAPTIVE_THRESH_GAUSSIAN_C,
      CV_THRESH_BINARY, 35, 25
       );
  cvCreateShowWindow("adaptive_thresh", adaptive_thresh);
  cvSaveImage("adaptive_thresh.jpg",adaptive_thresh,0); 
#endif /* CV_ATHENA_ADAPTIVE_THRESH*/

#ifdef CV_ATHENA_SMOOTH_BEFORE_MORPH  
  IplImage* smooth_src_morph = thresholded;
  IplImage* smoothed_morph = cvCloneImage (smooth_src_morph);
  cvSmooth ( smooth_src_morph, smoothed_morph, CV_GAUSSIAN,
       21, 21, 0, 0
      ); 
  cvCreateShowWindow("smoothed_morph", smoothed_morph);
  cvSaveImage("smoothed_morph.jpg",smoothed_morph,0);
#endif /* CV_ATHENA_SMOOTH_1*/

#ifdef CV_ATHENA_MORPH  
  IplImage* morph_src = smoothed_morph;
  IplImage* morphed = cvCloneImage(morph_src);
  IplImage* morph_tmp = cvCloneImage(morph_src);
  int mask_strength = 14 ;
  cvMorphologyEx ( morph_src,morphed,morph_tmp,
       NULL,CV_MOP_OPEN,mask_strength
                );
  /* cvMorphologyEx ( morphed, morphed, morph_tmp,
       NULL,CV_MOP_CLOSE,2
      ); */
  cvCreateShowWindow("morphed", morphed);
  cvSaveImage("morphed.jpg",morphed,0);
#endif /* CV_ATHENA_MORPH*/


#ifdef CV_ATHENA_SMOOTH_BEFORE_THRESHOLD
  IplImage* smooth_src_thresh = morphed;
  IplImage* smoothed_thresh = cvCloneImage (smooth_src_thresh);
  cvSmooth ( smooth_src_thresh, smoothed_thresh, CV_GAUSSIAN,
    21, 21,0,0
   ); 
  cvCreateShowWindow("smoothed_thresh", smoothed_thresh);
  cvSaveImage("smoothed_thresh.jpg",smoothed_thresh,0);
#endif /* CV_ATHENA_SMOOTH_BEFORE_THRESHOLD*/

#ifdef CV_ATHENA_THRESHOLD
  IplImage* bin_thresh_src = smoothed_thresh ;
  IplImage* bin_threshed = cvCloneImage (bin_thresh_src );
  cvThreshold ( bin_thresh_src, bin_threshed,
    120, 255, CV_THRESH_BINARY
      );
  cvCreateShowWindow("bin_threshed", bin_threshed);
  cvSaveImage("bin_threshed.jpg",bin_threshed,0);
#endif /* CV_ATHENA_THRESHOLD */


#ifdef CV_ATHENA_SMOOTH_BEFORE_CANNY
  IplImage* smooth_src_hough = bin_threshed;
  IplImage* smoothed_hough = cvCloneImage (smooth_src_hough);
  cvSmooth ( smooth_src_hough, smoothed_hough,
    CV_GAUSSIAN, 71, 71, 0, 0
   ); 
  cvCreateShowWindow("smoothed_hough", smoothed_hough);
  cvSaveImage("smoothed_hough.jpg",smoothed_hough,0);
#endif /* CV_ATHENA_SMOOTH_BEFORE_CANNY*/

#ifdef CV_ATHENA_CANNY
  IplImage* canny_src = smoothed_hough ;
  IplImage* canny = cvClone ( canny_src );
  cvCanny(canny_src, canny, 10, 10, 3); 
  cvCreateShowWindow("canny", canny);  
  cvSaveImage("canny.jpg",canny,0);
#endif /* CV_ATHENA_CANNY*/

#ifdef CV_ATHENA_HOUGH_CIRCLES
  IplImage* hough_src = canny ;
  IplImage* cir = hough_circles ( hough_src );
  cvCreateShowWindow("cir", cir);
  cvSaveImage("cir.jpg",cir,0);
#endif /* CV_ATHENA_HOUGH_CIRCLES*/

#ifdef CV_ATHENA_CONTOURS      
  IplImage* contour_src = cir ;
  IplImage* contoured = find_contours ( contour_src );
  cvCreateShowWindow("contoured", contoured);
  cvSaveImage("contoured.jpg",contoured,0);
#endif /* CV_ATHENA_CONTOURS*/      


  cvWaitKey(0);
  cvDestroyWindow("tmp");
  cvDestroyWindow("hsved");

  return 0;

}/* end of main */

void cvCreateShowWindow(char* _name, IplImage *_src)
{
 cvNamedWindow ( _name, CV_WINDOW_NORMAL ) ;
 cvShowImage ( _name, _src ) ;
 
}

IplImage* hsv_from_rgb(IplImage* _src)
{

  IplImage* img = cvCloneImage ( _src ) ;
  cvCvtColor ( _src, img, CV_BGR2HSV );
  return img;

}

IplImage* hsv_threshold ( IplImage* _hsv_src,
        CvScalar _min,
        CvScalar _max )
{
 IplImage* thresholded = cvCreateImage(cvGetSize( _hsv_src ), 8, 1 );
 cvInRangeS( _hsv_src, _min, _max, thresholded );  
  
    return thresholded;  
}

IplImage* hough_circles ( IplImage* _src )
{
   CvMemStorage* storage = cvCreateMemStorage(0);
   /* CvSeq* circles = cvHoughCircles (_src, storage, CV_HOUGH_GRADIENT,
            1, _src->height/6, 100, 50,0,0
           ); */
   CvSeq* circles = cvHoughCircles ( _src, storage, CV_HOUGH_GRADIENT,
          2, 10, 200, 100 , 50, 130
         );
   IplImage* cir = cvClone(_src );
   cvSetZero (cir);
   size_t i;
   for ( i = 0; i < circles->total; i++)  {   

     float* p = (float*)cvGetSeqElem(circles, i); 
     CvPoint center = cvPoint( cvRound(p[0]), cvRound(p[1]) );
     int radius = cvRound(p[2]);
     cvCircle( cir, center, radius+10, CV_RGB(0,0,255), 2, 8, 0 );
     
  }

 return cir;
}   

IplImage* find_contours ( IplImage* _src )
{
 CvMemStorage *mem = cvCreateMemStorage(0);
 CvSeq *contours = 0;
 int n = cvFindContours (_src, mem, &contours, sizeof(CvContour),
       CV_RETR_CCOMP, CV_CHAIN_APPROX_NONE,
       cvPoint(0,0)
       );
 /* int n = cvFindContours ( gray, mem, &contours, sizeof(CvContour),
        CV_RETR_LIST, CV_CHAIN_APPROX_SIMPLE,
        cvPoint (0,0)
        ); */
 IplImage* res = cvCloneImage(_src) ;
 cvSetZero(res) ;
 for (; contours != 0; contours = contours->h_next)
 {
     cvDrawContours (res, contours, CV_RGB(255,0,0),
      CV_RGB(0,0,0), -1, CV_FILLED, 8, cvPoint(0,0)
      );
 }
 return res;
}


At present the code uses 9 of 11 stages in the pipeline. they are,

RGB to HSV conversion
    the image is converted from RGB(RED-GREEN-BLUE) into HSV(HUE-SATURATIONN-VALUE) representation. easier to color based separation. The HUE value signifies the color of the objects. VALUE represents the brightness of the pixel. SATURATION represents the intensity.


RGB to HSV
HSV Thresholding
    the images is converted into binary image. The pixels whose HSV values lie between the specified range will appear white and the other pixels will turn black.
 

HSV-Threshold
Smoothing
    Smoothing in most cases, is done to reduce noise.


Smoothing before morphing
Morphing
    The OPEN morphological operation is used to erode the tiny black regions. OPEN is a combination of erode and dilate operations which cleans the image a bit.

Morphological Operation - OPEN


Smoothing


Thresholding
    This stages separates the object of interset after the morphological operation. This is similar to HSV thresholding.


Smoothing


Canny edge detection
    Canny edge detection, determines the boundaries of the object, and help in Circles detection using Hough Transform


Hough Transform for Circles
    find the circles present in the image. and draws them.


Read more ►

Tuesday, January 22, 2013

PCB designs

0 comments
     After the struggling with standard arduino boards and shields, we decided to design our own PCBs for use with the bot, and here are those... the design may be changed in near future based are requirements...


Read more ►

Thursday, November 1, 2012

Firmware for uC | Communication Interface

0 comments
In the last post, we had little introduction of how the firmware is going to act. With that picture in mind, now we will go a little deeper.

Android <==> BtBee <==> USART <==> uC

USART Communication
    Atmega16 contains one USART device. In this section we'll learn how to use it for receiving information. For using any of the peripherals in the uC, we need to do 

           + Switch ON the peripheral.
           + Configure the peripheral.
           + Use it.

Switching ON the USART
    Switching ON the USART involves, setting the TXEN and RXEN bits.
UCSRB |= _(RXEN) | _(TXEN);    /*enable the device */

Configuring the USART
   Configuring involves setting the Baud-rate of the USART device. In Atmega16, it can be done by writing the calculated Prescaler value into USART Baud Rate Register(UBRR). UBRR is a 16 bit register. UBRRH and UBRRL represents the higher and lower bytes of the UBRR.
UCSRC |= _(USBS);               /* use 2 STOP bits */
UCSRC |= _(UCSZ0) | _(UCSZ1)    /* use 8 DATA bit mode */

int baud_prescale = F_CPU/(16*baud) - 1;
UBRRL = baud_prescale & 0x00FF;
UBRRH = RSHIFT(baud_prescale, 8) & 0x00FF; 

Using USART
   USART device provides a data register named USART Data Register(UDR), which act as a buffer. There are two separate register for transmission and reception. UDR refers to one when used for transmission and another for reception.
unsigned char received_data = UDR ;
UDR = data;
Interrupt 
   We have seen the snippets for transmission and reception of data through USART. Using Interrupt mechanism in conjunction with USART provides a way for efficient use of the micro-controller time. For you to realize how useful the interrupt mechanism, here is an example. Here our purpose is to receive a byte of information through USART.

   You can just copy the contents of the UDR register at any time you want. If you do so, mostly the copied content will not the correct information, but some garbage value. We have wait for the USART device to complete reception and then copy the data. It is done as follows.
unsigned char USART_receive()
{
   while(UCSRA&(1<<RXC) );
   return UDR;
}

    USART indicates the reception of data by setting the RXC bit of UCSRA register to 1. We have to continuously monitor the RXC bit, and when it becomes 1, we return the data, i.e contents of UDR.

    By enabling the Interrupt mechanism, we can make the USART to interrupt the processor when, RXC becomes one i.e. when the reception is complete. This means that, the micro-controller can do some useful job without wasting its time in monitoring a single bit.And when the processor is interrupted, it will halt the operation, whatever it does and serves the Interrupt, and after serving the interrupt it can continues is operation where is was left.

    And of course, we have code the Interrupt Service Routine, a special function which is called when the interrupt occurs. There can be several interrupts, with several priorities. In avr-gcc, the interrupt service routines are coded as follows.
ISR(USART_RXC_vect)
{
   UCSRA &= ~(1<<RXC);  /* clears the RXC bit */
   return UDR;
}
    where the ISR and USART_RXC_vect is a predefined macros by avr-gcc. Here is the list of predefined interrupt vector names specific to a controller.
   List of Interrupt Vectors

Read more ►

Firmware for uC | Introduction

0 comments
   This post marks the beginning of a new article series discussing the development of the firmware, we coded for the atmega16 micro-controller(we call it the, ORGAN) used in the project.

   The firmware will not do anything unless the android(we call it the, BRAIN) asks it to do so. After lot of thinking, and experiments interrupt driven method is chosen  for implementation. When it receives a command usually one the predefined set of values defined through these directives.

file: athena.h
/************************************************************
 * Actual operations                                        *
 * they are used as indices for                             *
 * <category>_<operation>_<direction> function pointer array  *
 ************************************************************/

/*  LOCOMOTION OPERATIONS */
#define LOCO_FORWARD      LOCO_CONT_BEGIN +  01
#define LOCO_BACKWARD     LOCO_CONT_BEGIN +  02
#define LOCO_TURN_RIGHT   LOCO_CONT_BEGIN +  03
#define LOCO_TURN_LEFT    LOCO_CONT_BEGIN +  04
#define LOCO_TURN_AROUND  LOCO_CONT_BEGIN +  05
/*  CAMERA HANDLING */
#define CAM_LOOK_UP       CAM_CONT_BEGIN + 01
#define CAM_LOOK_DOWN     CAM_CONT_BEGIN + 02
#define CAM_LOOK_RIGHT    CAM_CONT_BEGIN + 03
#define CAM_LOOK_LEFT     CAM_CONT_BEGIN + 04
/* ARM CONTROL */
#define ARM_CONTRACT      ARM_CONT_BEGIN + 01
#define ARM_DILATE        ARM_CONT_BEGIN + 02
#define ARM_UP            ARM_CONT_BEGIN + 03
#define ARM_DOWN          ARM_CONT_BEGIN + 04
where the values of <category>_CONT_BEGIN are,
#define LOCO_CONT_BEGIN 00                               /* 00 */
#define LOCO_CONT_LEN   10
#define LOCO_CONT_END   LOCO_CONT_BEGIN + LOCO_CONT_LEN  /* 10 */

#define CAM_CONT_BEGIN  LOCO_CONT_END                    /* 10 */
#define CAM_CONT_LEN    10
#define CAM_CONT_END    CAM_CONT_BEGIN + CAM_CONT_LEN    /* 20 */

#define ARM_CONT_BEGIN  CAM_CONT_END                     /* 20 */
#define ARM_CONT_LEN    10
#define ARM_CONT_END    ARM_CONT_BEGIN + ARM_CONT_LEN    /* 30 */
So when the brain send one of these commands to the organ, the organ do the job for a fixed time frame and stop. (do not worry about the communication interface b/w brain & organ. we will come to that in next post.) What is now important is, firmware does the job for a fixed time duration when it is asked to do.


Read more ►

Saturday, October 27, 2012

AVR development in Linux

0 comments

Install necessary packages 

    $ sudo apt-get install gcc-avr
    $ sudo apt-get install avr-libc
    $ sudo apt-get install avrdude

Sample code

 #include
 void main()
 {

 }

Compiling code


   $ avr-gcc -Os -mmcu=$2 file_name.c -o file_name.elf
   $ avr-objcopy -j .text -O ihex file_name.elf file_name.hex

Uploading code

    $ sudo avrdude -p part_name -c programmer_id \
    >-U flash:w:file_name.hex
           + part_name => m16, m8
           + prog_id => usbasp
    + "flash" => programs flash
           + "w" => write mode 
  + shld be run as super user => "sudo" 

Compiler optimization

   specify an option -Ox while compiling (avr-gcc -Ox ... )
  + x => optimization levels
  + "-Os" => "s"=> small - for smaller code

 Made a video of LED blinking @ 900ms  

FUSE BITS:

 # read  
    $ avrdude -p m16 -c usbasp -U fuse_name:r:file_name.txt:h
        
        + fuse_name => lfuse,hfuse,lock  
   + "r" => read
        + fuse value "h" in hex format
       + stored in file_name.txt file  

 # write
          $ avrdude -p m16 -c usbasp -U fuse_name:w:0x82:m
          
        + "0x82" => sample fuse value
        + "m" => immediate ( use value in cmd directly )  
 + "w" => write

 Note: make use of AVR fuse CALC available online
Read more ►

Sunday, October 21, 2012

Setting up Git and Gitorious.org

2 comments
1. Backup any existing ssh keys
     $ cd ~/.ssh/
     $ mkdir key_backup
     $ mv *.pub ./key_backup/

2. Generate private ssh keys
     $ ssh-keygen -t rsa -C "developer.rps@gmail.com"
     $ Enter file in which to save the key: filename
     $ Enter passphrase : *****

3. Add private ssh key to git.gitorious.org account
     $ sudo apt-get install xclip
     $ xclip -sel clip < ~/.ssh/filename.pub

       - go to account setting in the user page of git.gitorious.org
       - Go to your Account Settings
       - Click ssh keys
       - Click "Add SSH key"
       - Paste your key into keyfield
       - Click Add key

4. Check whether ssh key is successfully added
     $  ssh -v git@gitorious.org


5.1. Clone the remote repo
     $ mkdir ~/workspace/
     $ cd ~/workspace
     $ git clone git://gitorious.org/athena/athena


5.2. Create remote repo from existing local repo
     $ mkdir ~/workspace/
     $ cd ~/workspace
     $ # add files if not already exist
     $ git init
     $ git remote add origin git@gitorious.org:athena/athena
     $ git commit * -m "some message"
     $ git push origin master


6. Adding files to remote repo
     $ cd ~/workspace/athena
     $ nano someFile.txt

7. Add some msg to it, save and exit
     $ git add someFile.txt
     $ git status
     $ git commit -a
     $ git remote set-url --push origin git@gitorious.org:athena/athena.git
     $ git push origin master #only for the first time,
     $ #next time onwards just use "git push")

   If the step 7 throws an error like this,
          $ Permission denied(publickey).fatal:The remote end hung up unexpectedly

  do the following, then try pushing
     $ ssh-add ~/.ssh/id_rsa.pub
     $ git push

8. Getting files from remote repo
     $ git pull


7. Start a new branch
     $ git branch feature-A
     $ git branch -a

8. Select new branch
     $ git checkout feature-A

9. Push commits on new branch to remote repo
     $ git push origin feature-A

10. Merge new branch with master
     $ git checkout master
     $ git merge feature-A

11. Delete a local branch
     $ git branch -D feature-A

12. Delete a remote branch
     $ git push origin --delete feature-A
Read more ►

Saturday, October 6, 2012

Software design - Proposal 01

1 comments
 Starting with a crude idea and refine it step by step..
   
    Requirements
        + accept a command
        + process and understand it
        + do it

    Refined 01
        + accept voice command
        + convert it to text
        + understand the text --> mostly pickup an object
        + find the object by looking around
        + go nearer to the object
        + pick it up if possible
        + track back to the initial position

    Refined 02
        + detect the object - DETECTION
        + calculate the distance and size of the object - GUESSING
        + track the object - TRACKING
        + go to the object
        + pick up the object if possible.
        + return back to the initial position or who commanded.
           
Before doing anything it is important to write the firmware for the uC.
    I'm planning to implement the firmware as a finite state machine. again the specification for the firmware are

        + LOCOMOTION OPERATIONS
        - LOCO_FORWARD
        - LOCO_BACKWARD
        - LOCO_TURN_RIGHT
        - LOCO_TURN_LEFT
        - LOCO_TURN_AROUND
    + CAMERA HANDLING
        - CAM_LOOK_UP
        - CAM_LOOK_DOWN
        - CAM_LOOK_RIGHT
        - CAM_LOOK_LEFT
    + ARM CONTROL
        - ARM_CONTRACT
        - ARM_DILATE
        - ARM_UP
        - ARM_DOWN
   

    these are some example operations performed by the uC when commanded by the BRAIN
    other than these there are several house-keeping functions. as previously said the uC ATmega16 is selected. the command is received thro the USART
    _____________         _________________
    | uC | USART|  <----> | BtBee | BRAIN |
    """""""""""""         """""""""""""""""
Read more ►

Tuesday, September 25, 2012

Getting ready for first review

0 comments
   Weeks went and we have finished voice recognition in Android portion of the project in Android . So we are planning to report it on first review. So next plan is to code image processing utils. here after. And also we are now familiar with Git SCM. We use Gitorious repo for our project, here is it: Repository for Athena[https://gitorious.org/athena/athena]
Read more ►

Monday, September 24, 2012

Git Simple Commands

0 comments

I keep forgetting how to push files and pull them down. So, this post is for my reference to use GIT.

Adding files to the remote repo


1. Adding the folder(or file) => git add <filename>
2. Checking status of git (confirm whether it is staged) => git status
3. Commiting => git commit -a


4. Pushing the files into remote repo => git push


5. Listing the files (not necessary)


Pulling down files from remote to local repo


Read more ►

Thursday, September 6, 2012

Started with Speech Recognition

0 comments

Couldn't finish up with the bluetooth part of the project. Will deal with it on a good day ( hopefully next week). Luckily, I'm gonna have 9 days OFF. Next week, TCS and HCL companies are coming to the college for Campus Selection. A lot of people get selected in that (here, every Btech student's last hope is TCS), so, we were given a week off for preparation. Anyways its not my issue. Coming back to Speech Recognition.

I used the speech recognition API provided by Android - simple, easy and perfect. Works better than what i thought. One drawback is that it uses an Internet (google) service to identify speech and convert it to words. We are planning to use Pocket-Sphinx in the future where the signal processing is done on-board but the drawback in that is that it has high RAM requirements. It takes quite some time to recognize words from speech even when I tested it on my PC (4GB RAM). Lets see about it in the future. For now, this will do.

Some of the images in my app:


As you can see above, there is a list of strings returned. Actually the intent returns an ArrayList<String>, which is added to the ListView as ArrayAdapter. I'm planning to store all the possible commands (to be sent from Android->uC) in the database and when the user gives a command through speech, we iterate through the ArrayList returned by the intent using ArrayList.Iterator() and look for a possible match in the database. It requires an efficient algorithm to search the database and find the match. Then, the matched command is sent to the uC. I believe that this idea is better than OK. 

A chunk of code for iterating through the ArrayList and looking for Integers:


  1. protected void onActivityResult(int requestCode, int resultCode, Intent data)
  2. {
  3.         if(requestCode==check && resultCode==RESULT_OK)
  4.         {
  5. ArrayList<String> results=data.getStringArrayListExtra(RecognizerIntent.EXTRA_RESULTS);
  6.                        
  7.         while(results.iterator().hasNext())
  8.         {
  9.                 String temp=results.iterator().next().toString();
  10.                                
  11.                 if(isInteger(temp))
  12.                 {
  13.                         tvSpeechResult.setText(temp);
  14.                         break;
  15.                 }
  16.         }      
  17.                                
  18.         }
  19.         super.onActivityResult(requestCode, resultCode, data);
  20. }
  21.        
  22. public boolean isInteger(String ip)
  23. {
  24.        
  25. try {
  26.                        
  27.         Integer.parseInt(ip);
  28.        
  29.         return true;
  30. } catch (Exception e) {
  31.         return false;
  32.     }
  33.                
  34.                
  35. }


Hoping to get back to the Bluetooth API soon...


Read more ►
 

Copyright © Project Athena Design by O Pregador | Blogger Theme by Blogger Template de luxo | Powered by Blogger